

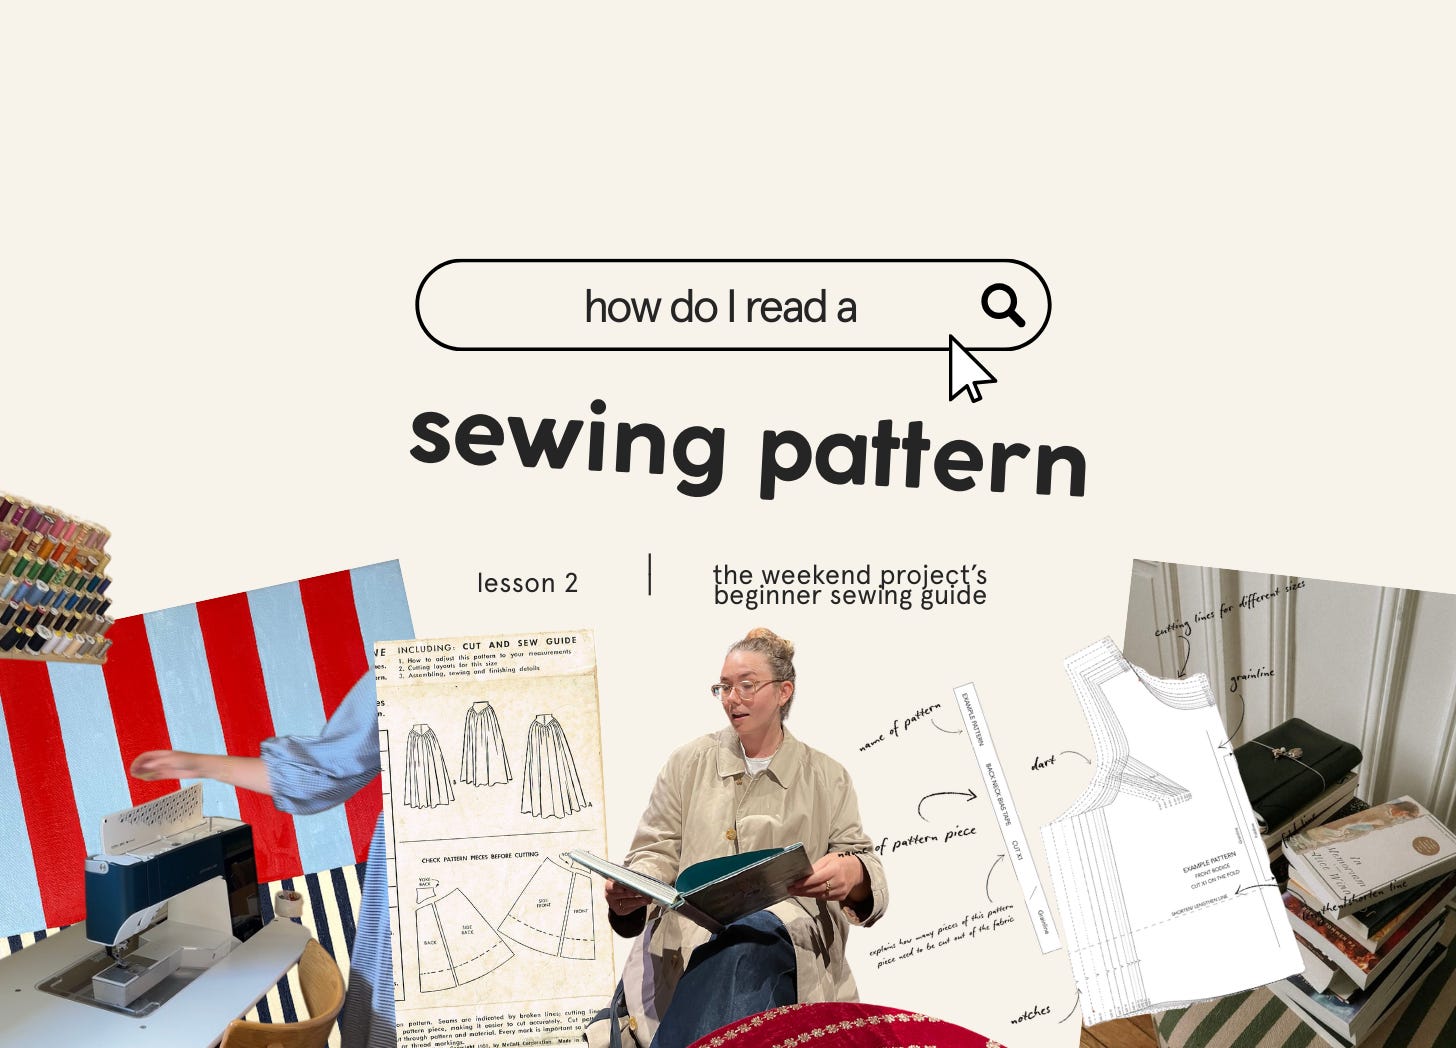
How to read a sewing pattern: a beginner’s guide
Step-by-step tips for understanding and using absolutely any sewing pattern!

The very first time I looked at a sewing pattern, I felt like I was reading hieroglyphics. It was like when they introduced letters into maths, and you still don’t know your times tables (guilty), and suddenly it’s all ‘E = mc2’, and you’re freaking out in the back of the class because this all feels way too hard and now I need a cup of tea and a lie down.
But let me hold your hand when I say this, it’s really not that hard. I promise!
To understand a sewing pattern, you just need to know how to read it.
So, in this edition of my Beginner’s Guide to Sewing, I’m going to tell you exactly how to read a sewing pattern! We’ll be covering:
What is a sewing pattern, and do you actually need to use it?
Knowing what size to make.
Understanding pattern pieces.
Learning what the markings on a pattern mean, like notches, grainline markings, cutting lines and more!
How do you know how much fabric to buy?
… and so much more!!
Just a heads-up: This newsletter is definitely on the longer side! If you’re reading via email, you might see a ‘View Entire Message’ prompt at the bottom — click that to keep reading. Or, for the best experience, open it in the Substack app (my favourite way to read these).
If you’re an experienced sewist and notice I’ve missed some crucial pattern info, please leave your beginner tips in the comments!
Or, you can share this with someone who wants to learn to sew. Sharing is caring, and it really helps this newsletter grow so I can continue writing more of these guides!
First things first: What actually is a sewing pattern?
A sewing pattern is a template that shows you:
What shapes to cut out of fabric
How many pieces you’ll need
Then there are also instructions, either printed on the same page as the sewing pattern or in a separate booklet, that tells you:
How those pieces fit together
The order to sew everything in
A sewing pattern is important because, instead of guessing how to make a sleeve or shape a waistband, the pattern does the planning for you and then explains the steps to put it all together.
There are two main types of sewing patterns:
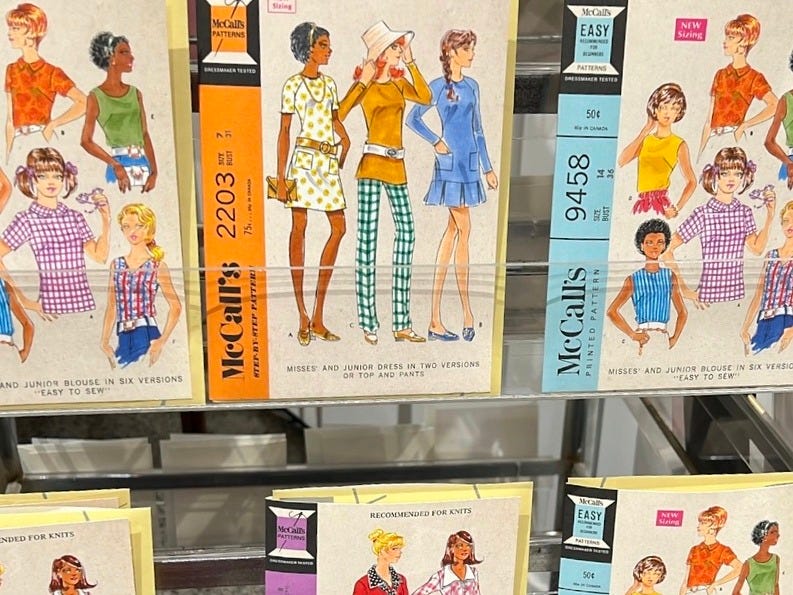
Paper patterns
These are the traditional kind you can buy in shops. Inside the envelope, you’ll find large sheets of tissue paper printed with pattern pieces, plus instructions. They’re great if you don’t have a printer or prefer working with something physical.
PDF patterns
These are downloadable files that you print at home. They’re often cheaper, reusable, and very easy to buy online. If you want to buy a PDF pattern, there are loads on Etsy, but it can be hard to find good patterns amongst all the AI slop. Instead, look at The Fold Line! They’re a great alternative because they also sell lots of patterns from various designers, but because they just sell patterns and it’s well curated, you can guarantee you won’t accidentally buy an AI pattern that doesn’t make sense.
One of the best things about PDFs is that you can print them again if you make a mistake. That’s very helpful if you accidentally cut the wrong size (it happens to all of us at some point!).
If you want to read more about sewing patterns, I wrote a brief history of the paper pattern industry!

Do I actually need to buy a sewing pattern before I can start sewing?
Short answer: no.
Long answer: they make things much easier when you’re learning.
You can sew without a pattern, especially for simple items like:
Wrap skirts
Boxy tops
Tote bags
These can be made using simple measurements and a bit of trial and error. There are also free patterns online and tutorials that teach you how to draft your own.
Some people like to draft their own patterns by looking at how they’re put together or even taking them apart to understand the construction. Draping fabric on a dress form (or even on yourself) is another great way to experiment.
However, for beginners, I would recommend starting with a sewing pattern. A good pattern with clear instructions (and preferably a video tutorial) can save you time, reduce frustration, and help you get a better fit. This is especially true for more complex garments like dresses, fitted tops, or trousers with zips.
What comes inside a sewing pattern?
When you open a sewing pattern, either out of a pre-printed envelope or a digital PDF pattern, you’ll usually find two main things:
1) The instruction booklet
This explains what to cut, what the symbols mean, and the order to sew everything.
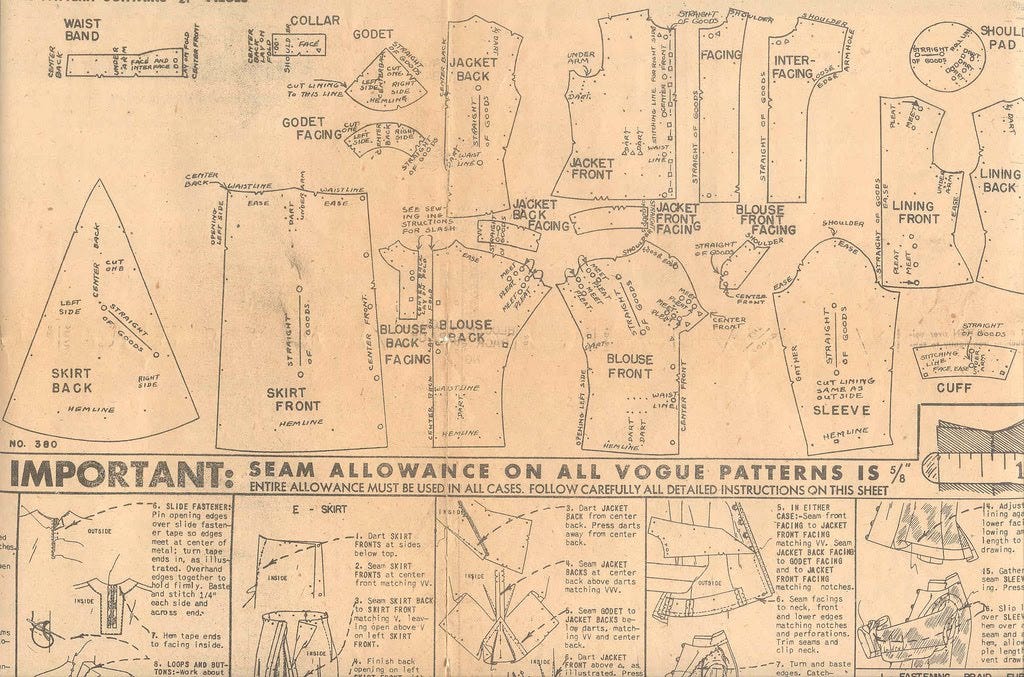
2) The pattern sheets
These are the pages with all the shapes (pattern pieces) printed on them. Each shape is a different part of the garment (sleeve, front, back, collar, etc.).
Before you do anything else, take a few minutes to look through both. You don’t need to understand everything straight away, just get familiar with what’s there.
Start with the size chart
One of the most confusing things for beginners is sizing.
Sewing pattern sizes are not the same as shop sizes. You might wear a size 10 in stores, but need a size 14 in a sewing pattern. Or, the pattern will have letter-based sizing, so instead of being a size 12, you could be a size D. This is completely normal.
Inside the pattern instructions, you’ll find a size chart based on body measurements like:
Bust
Waist
Hips
Use a measuring tape to measure yourself. Then compare your measurements to the chart. That will be how you choose your size!
Check the finished garment measurements
Another important thing to know when picking your size is that patterns usually also include finished garment measurements. This tells you how big the item will be once it’s sewn.
Looking at the finished garment measurements is important because it helps you understand the fit.
For example:
If the finished garment bust measurement is a lot larger than your bust, the top will be loose.
If it’s close to your body measurement, it will be more fitted.
This helps you decide whether you want to size up or down, depending on how you like your clothes to fit. So, based on my body measurements, I could be a size 12 (or D, or some other name), but because I prefer looser garments, I would size up to a size 14.
If this whole size chart/finished garment stuff is still confusing you, Syd Graham has a great video explaining sewing pattern sizing over on YouTube.
Understanding pattern pieces
Each printed shape on the pattern sheet is a piece of the garment.
Common examples include:
Front bodice
Back bodice
Sleeve
Skirt panel
Waistband
The instruction booklet will tell you:
Which pieces you’ll need for the version or view you’re making (some patterns include multiple style options)
How many of each piece to cut (for example, “Cut 1 on fold” or “Cut 2 mirrored”)
Which fabric to use for each piece (main fabric, lining, interfacing, etc.)
You’ll usually see a small number or letter printed on each pattern piece. This corresponds directly to the instructions. For example, the instructions might say “Sew Piece 1 to Piece 2 at the shoulder seam.”
Some advice I wish I had when I started sewing was to make sure you write the name or number of the pattern piece onto the fabric when you cut it out. (Read on to the section ‘Notches, grainlines, and markings’ for more advice on keeping your fabric pieces organised.)
Cutting layouts (how to place pieces on fabric)
Patterns also include diagrams called cutting layouts. These show you the best way to place pattern pieces on your fabric before cutting. I’m usually terrible at following cutting layouts and will just place my pattern pieces wherever on my fabric. But!! If you do follow the cutting layout, it will help you use your fabric efficiently and make sure every pattern piece is facing the correct direction.
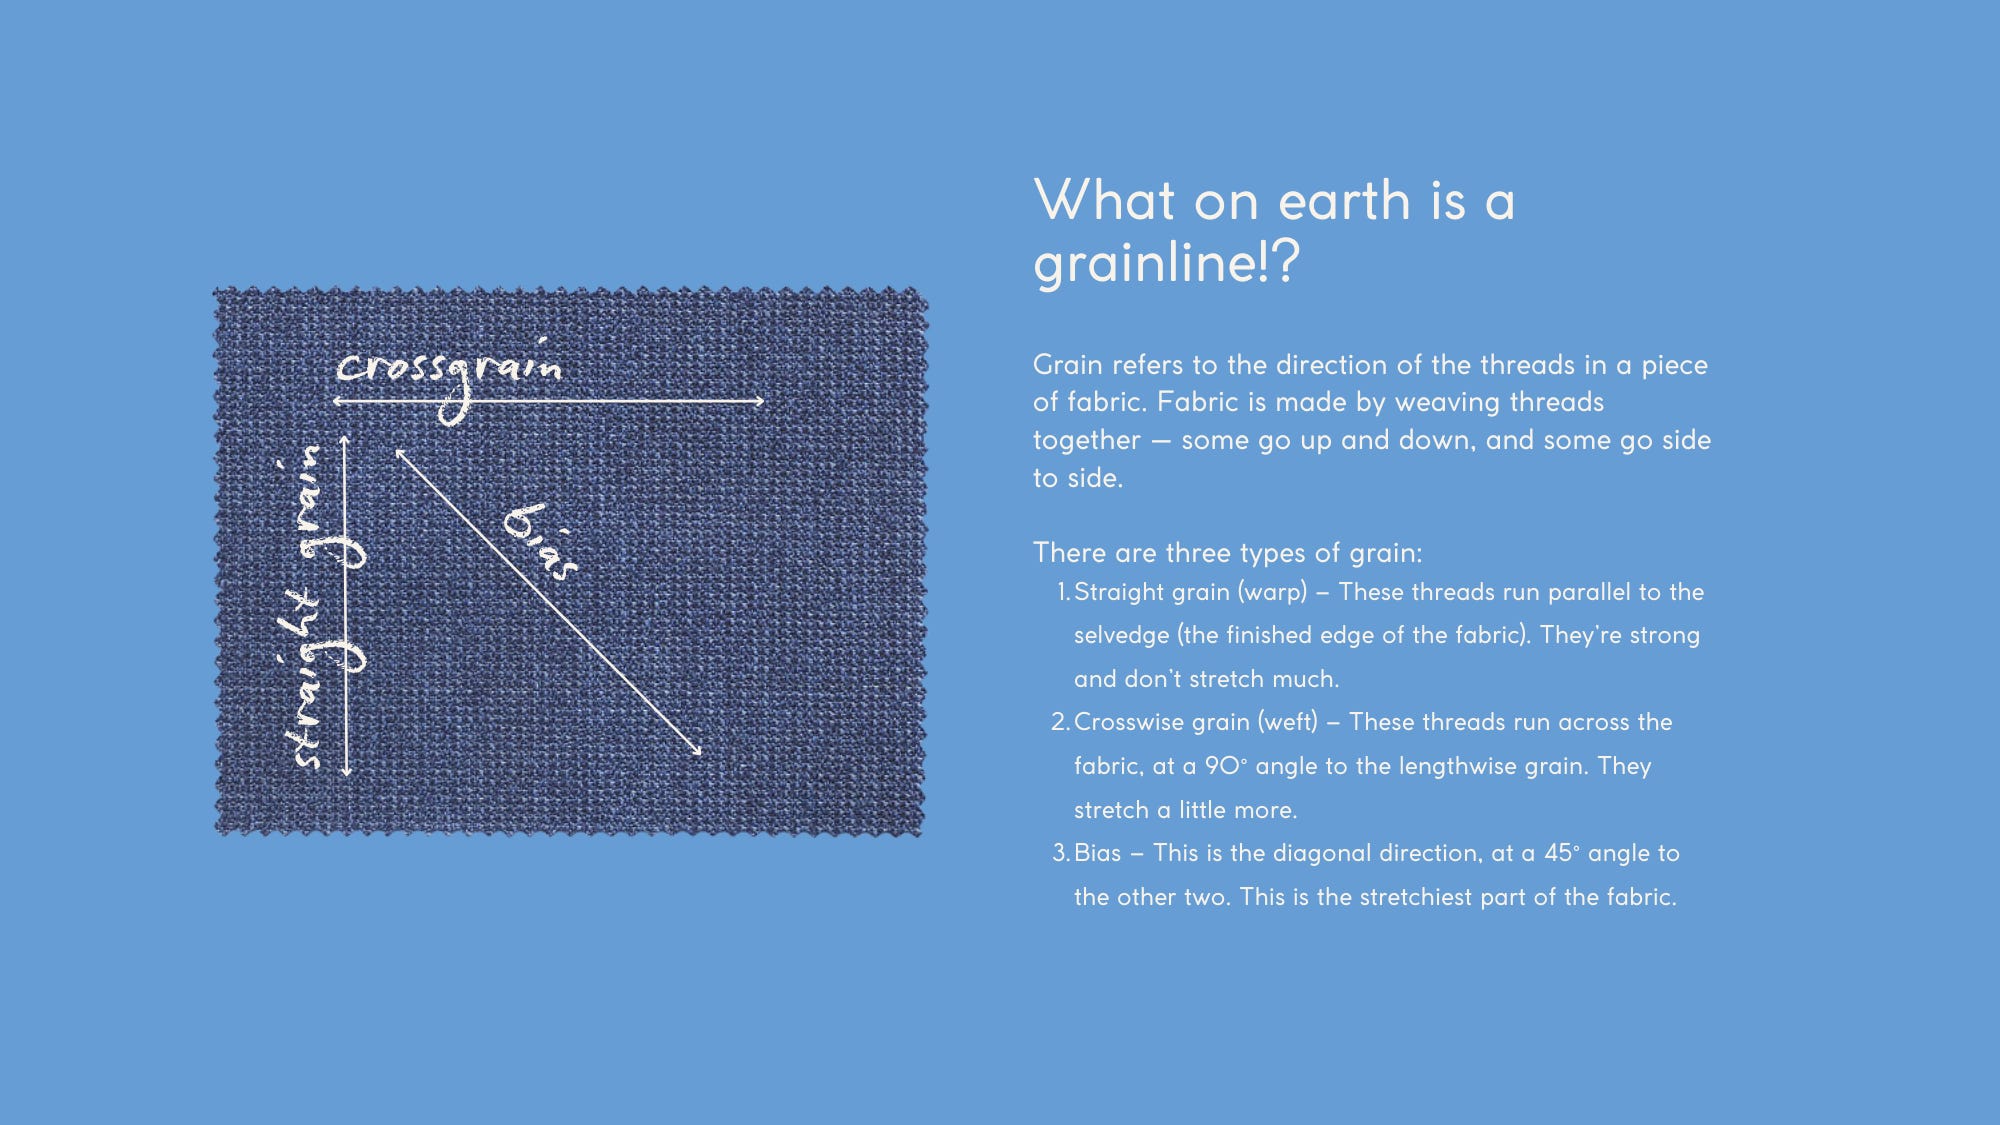
On the pattern pieces, you’ll also see grainlines. These lines show you what direction to place your pattern piece on your fabric, and they are usually marked as a long straight line with arrows at one or both ends. The grainline is meant to be aligned parallel to the fabric’s lengthwise grain (the warp threads), which runs along the selvedge edge. (fyi the selvedge edge is the tightly woven, finished edge along each side of the fabric that prevents it from fraying)
Keeping the grainline straight ensures that the garment hangs properly on the body, maintains its intended shape, and doesn’t twist or sag over time.
Fabric behaves differently depending on direction. The lengthwise grain is generally the most stable, the crosswise grain (weft) has a bit more give, and the bias (a 45-degree angle to the grain) has the most stretch and drape.
By following the cutting layout and the grainline markings, you’re making sure the pattern piece takes advantage of the fabric’s structure in the way the designer intended. If the grainline is off (even slightly!), it can affect how seams line up, how the garment fits, and how it moves when worn.

Keep track of seam allowances!!
A seam allowance is the space between the raw edge of the fabric and the line where you sew your stitches. In other words, it’s the extra fabric that sits outside the seam line and allows you to join pieces together securely. After the seam is sewn, this extra fabric is usually pressed to one side, trimmed, graded, or finished to prevent fraying.
This is important to know because commercial sewing patterns are drafted with a specific seam allowance already included. That means the size and fit of your garment depend on your sewing at the correct distance from the fabric edge. If you sew with a seam allowance that is too wide, your garment may turn out smaller than intended. If your seam allowance is too narrow, the garment may end up too large, and seams may be weaker or more prone to fraying.
Before you cut out your pattern pieces, check your pattern instructions to see what seam allowance is included in the pattern. Many patterns use ⅝ inch (1.5 cm), while others can use ½ inch (1.25 cm) or ⅜ inch (1 cm). The instructions will tell you all of this info!
If there is no seam allowance included in the pattern pieces, make sure to add your own before cutting your fabric! If you don’t add one, you won’t have enough space on your fabric to sew a seam. You can add any size seam allowance you like. Whenever I have to add my own, I choose 1cm because it works with the seam guides on my sewing machine.
Once you start sewing, you want to make sure your stitching line stays consistently at that required distance from the fabric edge. Most sewing machines have seam allowance guidelines marked on the needle plate (the metal plate under the presser foot). You can line up the raw edge of your fabric with the correct measurement marking to help guide you. For extra accuracy, some sewists place a small piece of masking tape on the needle plate at the correct seam allowance line to act as a visual guide.
Keeping your seam allowance consistent (even more than sewing perfectly straight!) is what ensures your pieces don’t get too big or too small, and your finished project fits you in the intended way.
Notches, grainlines, and markings (all the little markings on pattern pieces)
These small details might seem confusing at first, but they’re there to guide you. Knowing what they mean and how to use them can really make the difference between a finished project that looks and fits beautifully and a frustrating sewing project that ends up looking ugly.
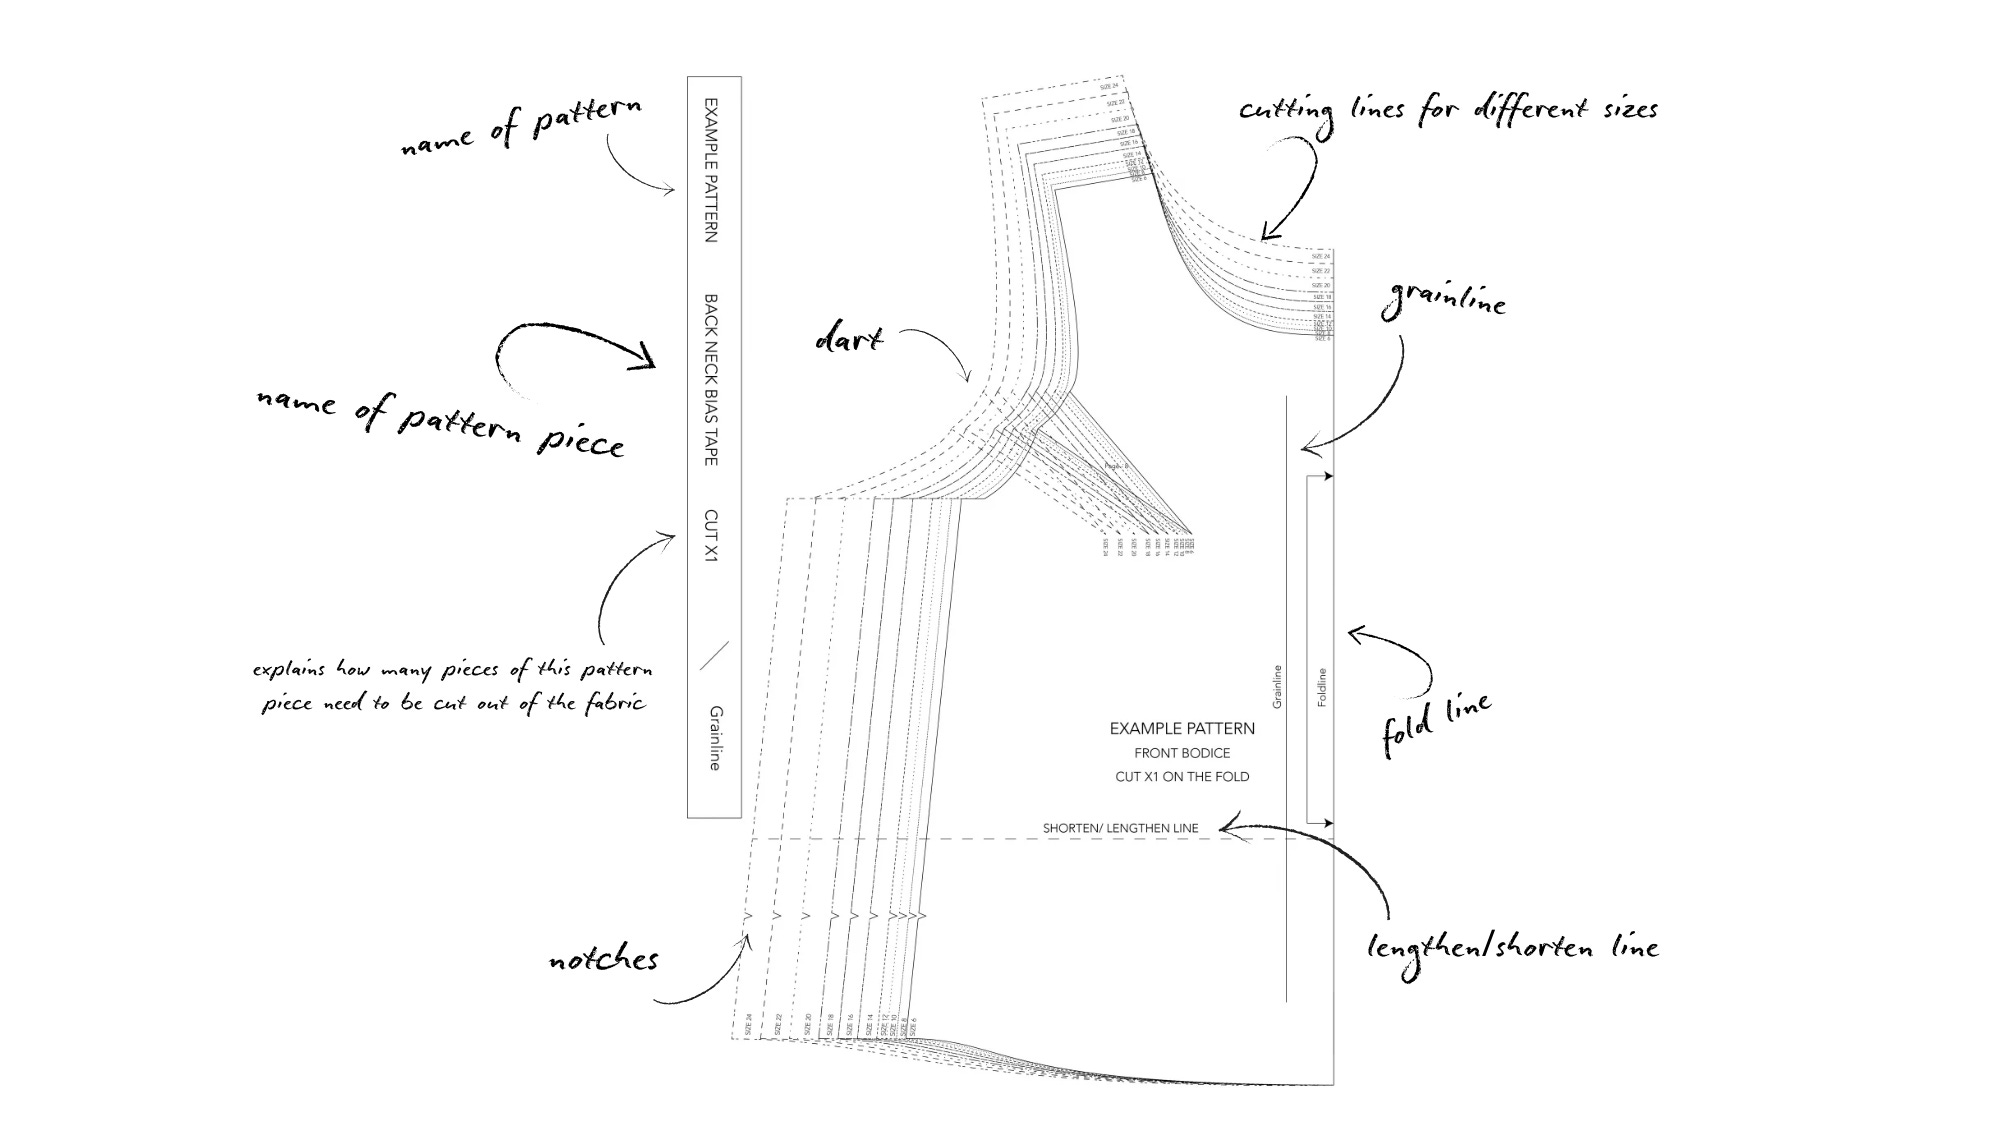
Notches
Notches are tiny triangles or marks along the edges of pattern pieces. They help you match different pieces together correctly when you’re sewing.
For example:
A sleeve might have a single notch at the front and a double notch at the back. The single notch will match the single notch in the armhole on the front piece of a shirt, and the double notch will match the double notch in the back piece.
A skirt panel might have notches that match specific points on the bodice.
When sewing, you line up the notches before pinning or clipping your pieces together. This ensures seams are aligned properly, and fabric is distributed evenly.
When cutting your fabric, don’t cut the notches inward into the seam allowance. Instead, make a small outward snip (about ¼ inch / 6 mm) or trim a tiny triangle sticking out. This keeps your seam allowance strong and prevents accidentally cutting too deep.
Markings
Markings are symbols printed inside the pattern pieces (not just along the edges). They indicate where important design features should be placed or sewn.
These might show:
Darts — usually marked with lines forming a triangle or diamond shape. Darts shape the fabric to fit the curves of the body (like in the bust or waist).
Button placements — small circles or crosses showing exactly where buttons and buttonholes go.
Pocket positions — outlines or placement guides showing where to attach or align pockets.
Fold or “Place on Fold” — These tell you that the edge of the pattern piece should be placed against a folded edge of fabric so you cut a symmetrical piece. Unlike other edges, you don’t cut along this fold.
Pleat and Gather Marks
Pleats are shown with parallel lines and sometimes arrows. They tell you where to fold and in which direction to fold the fabric to create folds.
Gathering points may be small dots or wiggly lines showing where to sew a long line of stitches, which you can then gently pull to create a gather that makes the edge of the fabric smaller.
Zipper & Opening Marks — some patterns include small bars or vertical lines that show where a zipper should be inserted, or where an opening or vent begins/ends.
Lengthen/Shorten Lines — these are parallel lines across a pattern piece that show a recommended place to adjust the length if you need the garment to be longer or shorter.
Centre Front (CF) / Centre Back (CB) — these indicate the true middle of a garment piece, which matters when you’re aligning facings, placing closures, or checking symmetry.
Grainlines
These are long arrows on the pattern. They show how the piece should be placed on the fabric so the garment hangs properly and doesn’t twist. (As discussed earlier.)
Cutting Lines
You will also definitely see cutting lines. You use the cutting line to cut each pattern piece to your size.
If the pattern includes multiple sizes, you’ll see several cutting lines. It’s important to check what line is your size and only cut that one. If you’re confused, you could mark out your cutting line with a highlighter before taking scissors to paper. If you’re using a PDF pattern, you can also make your life easier by opening the pattern in Adobe Acrobat and checking if the file has size layers. If it does, only select and print your size! This is a sanity saver, especially if there are loads of sizes and all the pattern pieces start blurring into one!
Your pattern might have stitching lines. These are typically shown as dashed lines inside the cutting line and show you where the seam should be sewn. Not all patterns include printed stitching lines because they’ll rely on putting the seam allowance information in the instructions instead. I think stitching lines are a bit irrelevant and can make cutting out a pattern even more confusing. But this is why reading through your instructions before cutting and sewing is so important!
PSA: transferring markings to fabric is super important!!
If you forget to transfer the markings from the paper pattern to the fabric, you’ll lose those incredibly important guides. Learn from my mistakes and mark your fabric, because trying to figure out how to put together a garment without notches can be an absolute nightmare.
You can transfer markings using:
Tailor’s chalk
A washable fabric pen
Tracing paper and a tracing wheel
Thread tracing (loosely hand-sewing along the marking)
Mark them on the wrong side of the fabric so they’re there when you need them, but won’t show on the finished garment. The only exception is for markings like buttons/buttonholes, which should be on the right side where they’ll end up.
And always test marking tools on a scrap piece of fabric first to make sure they wash out or brush off!
Some other things you’ll see on a pattern envelope or in the instructions…
Line Drawings (Technical Drawings)
One of the most helpful things you’ll see on the pattern envelope or in the instructions is the line drawing (sometimes called a technical drawing or flat sketch).
Unlike styled photographs, line drawings show the garment as a simple black-and-white outline. Because there are no distracting prints, colours or accessories, you have a way clearer view of the construction details of the design.
Why this matters:
Line drawings show the true silhouette of the garment.
You can clearly see design features like darts, pleats, seams, pockets, collars, cuffs, or gathers.
If the pattern includes multiple views (View A, View B, etc.), the differences between them are much easier to spot in the line drawings.
You can see both the front and back clearly.
Photos can sometimes be misleading because fabric choice, styling, or photography can hide details. The line drawing shows the garment as it really is, which can help you decide whether you actually like the design and understand how it’s constructed.
Skill Level
Most patterns include a skill level, usually ranging from “beginner” to “intermediate” to “advanced”.
Beginner patterns usually include more detailed, step-by-step instructions. While this can feel overwhelming at first, those extra details are incredibly helpful when you’re starting. They often explain small but important techniques, like how to press seams correctly, clip curves, or finish raw edges.
If you’re learning to sew, choose patterns that:
Have fewer pattern pieces
Avoid complex features like collars, cuffs, facings, or zippers
Use simple closures (like elastic waistbands)
If you need help choosing your first project, I curated my favourite tips and beginner patterns here.

Fabric Suggestions
99% of the time, the pattern will recommend specific fabric types that suit the design. These suggestions are there for a reason!! The garment was drafted and tested using fabrics with certain qualities like stretch, drape, or structure.
For example:
A fitted knit dress will require stretch fabric.
A structured jacket may require a heavier woven fabric.
A flowy skirt will probably need something lightweight with drape.
If you follow the suggested fabric types, your finished garment is much more likely to look and fit like it’s supposed to.
As you gain experience, you can experiment with different fabrics, but you still need to respect basic fabric rules. For example, a pattern designed for stretch knit fabric won’t fit properly if made in a stiff woven fabric without serious adjustments.
Fabric Yardage/Meterage
The envelope or instruction booklet will also include a yardage/meterage chart. This tells you how many yards or meters of fabric to buy based on:
Your size
The view (A, B, etc.) you’re making
The fabric width (commonly 45”/115cm or 60”/150cm)
I’d also recommend:
Pre-wash all of your fabric because some fabrics shrink after the first wash.
Buy about 10% extra fabric as insurance. Especially if you think your fabric will shrink!
Purchase extra if your fabric has a nap (texture of fabric that obviously goes in one direction, like courduroy), directional print, stripes, or a large pattern, because these require careful layout and sometimes more fabric.
Having slightly more fabric is far better than running short!!
Notions!
Somewhere on the pattern envelope or in the instructions, you’ll find a list of notions. Notions are all the extra supplies needed to complete your project, including (but not limited to):
Zippers
Buttons
Elastic
Interfacing
Bias tape
Hooks and eyes
This list tells you exactly what to buy. Usually, even including lengths and sizes for things like zips and buttons.
Before going to the fabric store (or ordering online), read this section carefully and make a checklist. There’s nothing more frustrating than being halfway through a project and realising you forgot interfacing or bought the wrong zipper length!
Finally, follow the instructions step by step
I know it can be boring to read the instructions, but it will save you time and frustration! The instruction booklet is there for a reason and will not only tell you about sizing, how much fabric to buy, what notions you need, etc.
It will also guide you through the sewing order. Try to follow the order as written, especially when you’re starting. The instructions are there to help you!
What if it still feels confusing?
That’s completely normal!
Your first pattern might feel slow and unfamiliar. You might need to take a break or read each step a few times. That doesn’t mean you’re doing it wrong; it just means that you’re learning a new skill. Because reading a sewing pattern is a skill!! Just like learning to sew a straight line or use a sewing machine. So if it feels confusing at first, don’t worry, I promise it will get easier the more you practice. And eventually, you might even reach a point where you can glance at a pattern and immediately understand how the whole garment comes together.
Until that point, though, some things you can do if you get stuck are:
Look up a YouTube tutorial for the specific pattern
Watch general videos on reading sewing patterns
Take your time and go step by step
If you’re still confused, please reach out to me on Instagram or via email, and I’ll do what I can to help! Or, you could comment on this post and benefit from the wisdom that exists within this wonderful community!
Good luck, and happy sewing!

I would add that paper patterns can absolutely be reusable! If you’re not sure what size you want to make/if you think you may want to make a different size in the future, you can trace the pattern (usually with pencil, not a marker that will bleed through!) onto Swedish tracing paper or another type of pattern paper, making sure to trace both the shape of the pieces and the markings. This also gives you the freedom to alter the pattern without losing the original pieces. I also write the names of my pattern pieces on painters tape and use that to label my pieces - not all marking tools wash out very easily and not all fabrics take chalk, etc very well. Threadloop is an EXCELLENT resource to find patterns - each entry in the database has a link to the pattern and you can see other users’ projects and read their reviews
Goodness this was so so comprehensive and helpful! Thank you! I have about a year of sewing under my belt and still google "what is the grainline" before almost every project just in case ;)